In the world of 3D printing, a groundbreaking technology called HueForge has been making waves. This innovative approach to additive manufacturing has captured the attention of artists, makers, and enthusiasts everywhere, thanks to its unique capabilities and creative potential. The price to use HueForge is a subscription coming in at around $12 for personal use and up to $80/year for an annual license of the Pro version.
What is HueForge: A Revolutionary Approach
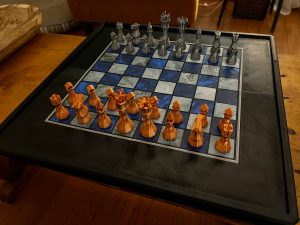
Have you ever wondered if it’s possible to create 3D prints that resemble beautifully painted artworks? HueForge offers exactly that. It has become a topic of intrigue and curiosity, especially among those familiar with traditional 3D printing methods. HueForge stands apart from the rest by introducing a new way to incorporate vibrant and seamless color transitions into 3D prints, revolutionizing the industry.
The standout features of HueForge are the following:
- Print time reduction: Unlike conventional lithophanes that require holding up to the light and time-consuming color changes on each layer, HueForge simplifies the process. Minimizing the number of color changes needed significantly reduces printing time, making it a more practical option for a wide range of 3D printers.
- Accessibility: Even printers with basic filament-swapping capabilities can produce impressive multi-colored prints using this technology; this opens up a new world of creative possibilities for artists, designers, and hobbyists.
- Color blending: It has captivated the imaginations of 3D printing enthusiasts worldwide. In the following sections, we’ll delve deeper into the inner workings of HueForge, explore its user-friendly software, and provide practical tips for optimizing your prints. Let’s embark on this exciting journey together and discover the endless creative potential of HueForge.

Leveraging a Layered Approach for Seamless Blending of Colors
At the core of HueForge lies its layered approach to 3D printing. Instead of attempting to mix colors on a single layer, the technology treats each filament layer as a progressive layer of ink. By stacking these layers meticulously, HueForge achieves unparalleled color blending, resulting in prints that resemble intricately painted artworks.
This layered technique opens creative possibilities, allowing smooth transitions between colors, gradients, and intricate patterns. The prints exhibit a remarkable depth and visual appeal, captivating the viewer with their lifelike representation.
HueForge is a game-changer in 3D printing, creating a revolutionary approach that sets it apart from traditional lithophanes. Let’s delve deeper into the essence of HueForge and explore what makes it such an intriguing technology.
How HueForge Differs from Traditional Lithophanes
When we think of lithophanes, we envision exquisite pieces that come to life when held up to light. However, HueForge takes a different route, offering a fresh perspective on creating visually stunning prints without external lighting. It introduces a new way of seamlessly merging colors within the print’s layers.
While most are interested in HueForge due to the headline feature of filament painting, it also supports backlit color lithophanes made with layered colors and Importing your STLs to see how they can benefit from filament blending.
Simplifying the Color-Changing Process and Reducing Print Time
One of the notable advantages of HueForge is its simplified color-changing process. In contrast to traditional lithophanes, which require multiple color changes on each layer, HueForge streamlines the workflow. Minimizing the number of necessary color changes significantly reduces the time needed for printing, making the process more efficient and accessible.
This reduction in print time is particularly valuable for artists and makers who seek quicker turnarounds and enhanced productivity. It empowers them to bring their creations to life with vibrant colors within a shorter timeframe, fostering faster iterations and facilitating creative experimentation.
Compatibility with a Wide Range of 3D Printers
One of the remarkable aspects of HueForge is its compatibility with a wide range of 3D printers. Unlike certain 3D printing technologies limited to specific printer models or configurations, HueForge’s layered approach can be implemented on most printers that support filament swapping. This flexibility expands the horizons for creators, allowing them to leverage HueForge’s capabilities using their existing equipment or even budget-friendly printers.
Whether you own a well-established printer or are just starting your 3D printing journey, HueForge offers an opportunity to unlock a world of colorful possibilities. It eliminates the need for costly upgrades or investments in specialized hardware, making it an accessible choice for creators who want to explore the realm of vibrant, multi-colored prints.

Tips and Tricks on How to Use HueForge
To truly unlock the potential of HueForge and create exceptional prints, mastering the art of image preparation and optimization is crucial. Here are some tips and tricks to help you achieve the best possible results with HueForge.
Pre-processing Images for Improved Print Outcomes
Before dragging and dropping your image into the HueForge software, it is often beneficial to pre-process the image to ensure optimal print outcomes. One important aspect is to remove any distracting or unwanted elements from the background of the picture. This step helps to focus the viewer’s attention on the main subject of the print and enhances its visual impact.
Adjusting the overall image sharpness and contrast can significantly improve print quality. Sharpening the image can enhance fine details and ensure crisp lines in the final print. Increasing the contrast can lead to more defined color transitions and a greater visual depth in the finished piece.
While HueForge also supports layered multi-color lithophanes, the front-lit Filament Paintings are what people are most interested in.
Enhancing Contrast and Sharpness for Optimal Results
In the context of HueForge, paying attention to contrast and sharpness is crucial for achieving the desired visual impact. Strive for a balance that enhances the details without overdoing it. Experiment with different levels of contrast and sharpness adjustments to find the sweet spot that complements your specific image and artistic intent.
Remember that the closer your source image resembles the desired output, the easier it will be to achieve the desired results. Applying contrast and sharpness adjustments helps bridge the gap between the source image and the final print, resulting in a more faithful representation of your artistic vision.
Utilizing Cell Shading and Other Techniques for Creative Prints
For those seeking to push the boundaries of creativity with HueForge, exploring techniques like cell shading can yield fascinating results. Cell shading is often used in animation, and digital art, characterized by distinct, flat areas of color without gradients. Applying cell shading to your image before processing it with HueForge can create unique visual effects reminiscent of comic book art or stylized illustrations.
Going THINNER rather than thicker often leads to better results and smoother blending.
Experimenting with various artistic techniques and effects can unleash a new realm of creative possibilities with HueForge. Feel free to explore different styles and brushstroke effects or even incorporate textures into your image. The more you experiment and innovate, the more unique and personalized your HueForge prints will become.
Big Thanks to HueForge!
Shop: https://shop.thehueforge.com/
Youtube: https://www.youtube.com/@hueforging
Twitter: https://twitter.com/hueforge
