
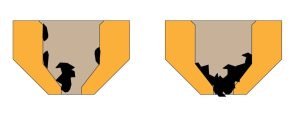
In this blog, we will dive into what 3D printing Under Extrusion is. If you start noticing gaps between adjacent extrusions of each layer, then you might be experiencing 3D printing under extrusion. A great way to detect 3D printing under extrusion is to print a small 20mm tall cube with at least 3 perimeter outlines. Check the top of the cube to see if the perimeters are strongly connected. If these are bonded and don’t have gaps, then it might be another issue. If you see that these are not strongly united, then you might have under extrusion. Below, we will mention the main causes of 3D printing under extrusion, and how you can fix it.
Main Causes and Solutions for 3D Printing Under Extrusion
Clogged Nozzles
Clogged nozzles are one of the most common causes of 3D printing under extrusion. This usually happens when you forget or procrastinate to clear your nozzles.
Cleaning or replacing the clogged nozzle can quickly solve the problem. Brushing the clogged nozzle with a thin wire or a guitar string can help.
Incorrect filament diameter
First, check that the printing software you are using knows what filament you are using. For example, ASA filament has different printing settings than PETG. You can find this under Settings and then on the Other tab. After that, verify that the diameter value matches the type of filament you are using.
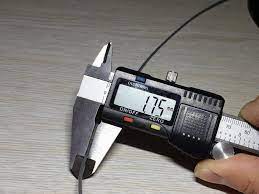
The most common values for 3D printer filament diameter are 1.75mm and 2.85mm. Check the 3D filament information before purchasing it to verify you are buying the correct one. Hackster provided a practical way to measure your 3D filament diameter. Digital calipers are great tools to measure the diameter of your filament.
Increase Flow Rate
If the diameter was not the issue, and you still have 3D printing under extrusion, then you should check the extrusion multiplier flow rate. You should find this under your Settings and Extruder tab. Understanding that each extruder on your printer can have a unique extrusion multiplier, then make sure to select the correct extruder settings for it.
First, you will have to calculate the flow rate. Based on that calculation then you will have to increase the flow rate. We will use PLA as an example, which generally prints with an extrusion multiplier close to 0.9/1.0. Try to increase the extrusion multiplier by 5% (0.05), and print again the test cube mentioned above. Most likely you won’t see those gaps between your perimeters.